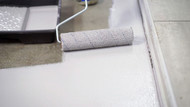
Epoxy is a beautiful way to upgrade your garage and basement floors from standard floor paints. The seamless and tough look shows professional and expert service. However, epoxy is easy to use, and you can apply it at home with epoxy kits.
The easy-to-mix and apply epoxy kits are durable on the surface and can withstand heavy weights or objects on the surface. Epoxy basement and garage floors are a great option for a low-maintenance, lifetime solution, especially against a concrete floor.
DIY garage and basement epoxy floor
The epoxy floorDIY is a great project if you want to achieve an appealing and attractive floor. Epoxy is made for easy application, and it is ideal for a home project that challenges you as well.
Benefits of DIY Epoxy Garage and Basement Floors
Upgrading your garage and basement floors with epoxy coating provides numerous advantages, making it an ideal choice for a DIY project. Here are some key benefits:
- Cost-Effective: Using a DIY epoxy kit allows homeowners to achieve a professional-looking finish at a fraction of the cost of hiring a contractor.
- Durability: Epoxy coatings are known for their exceptional strength and durability. They can withstand heavy weights, making them perfect for garages and basements that endure significant wear and tear.
- Low Maintenance: Once applied, epoxy floors require minimal maintenance. Their seamless surface is easy to clean and resistant to stains, oil, and chemicals.
- Aesthetic Appeal: With various colors and designs available, epoxy flooring enhances the visual appeal of your space, allowing for customization to match your home’s decor.
- Moisture Resistance: Epoxy coatings create a waterproof barrier, protecting the underlying concrete from moisture damage, which is particularly beneficial in basements.
- Easy Application: The simplicity of mixing and applying epoxy makes it accessible for DIY enthusiasts. Detailed instructions provided in the kits make sure a smooth process.
- Long-Lasting Solution: Epoxy floors are designed to last for years, offering a durable and attractive surface that can withstand the test of time.
- Increased Property Value: Upgrading to epoxy flooring can enhance your property’s value, appealing to potential buyers who appreciate durable and stylish finishes.
For a DIY epoxy floor, all you need is one of the ArmorClad garage and basement epoxy kits available at your nearest store, or you can find them at in an affordable range. Once you have a satisfactory garage and basement epoxy kit, all you have to do is follow the steps below.
Step 1: Surface preparation and cleaning
Cleaning and preparing the surface thoroughly is the first step in a DIY epoxy project. You need to make sure that the base or garage is clear of any furniture or obstructing items. Make sure there are no strains or cracks on the surface. If you find some strain or cracks in the floor, take your time and remove or patch the floor.
The second thing you need to consider is that the floor should be wiped clean, leaving no moisture or water on it. Any form of moisture or water kills the process or epoxy, making it hard to apply. As a result, extra precautions must be taken to remove any moisture, strain, or crack for seamless application. Once your floor is prepared for the epoxy, you can simply start by preparing the epoxy mixture.
Step 2: Apply the Primer
After preparing the floor, you have to apply the primer. A primer coat is already present in the DIY epoxy kit. It is simply applied like paint. Follow the instructions written on the kit. It should be kept in mind that primer application takes around 4–7 hours to completely settle down and get dry. The primer needs to be applied as per the manufacturer’s instructions. As the primer gets dry, you can move on to the next step.
Step 3: Applying the First Epoxy Coat
From the kit, take the powdered epoxy compound and mix it thoroughly. It should be kept in mind that the epoxy compound needs to be incorporated thoroughly. Once the mixture is ready, you can apply the epoxy with a brush. The main instruction to follow with epoxy is to make the coat as thin as possible with the nap brush. You have to cover the whole basement or garage with the epoxy coat. This second layer of epoxy usually takes another 4–7 hours to completely dry off. To be on the safe side, don’t forget to follow the manufacturer's instructions.
Step 4: Apply the Second Coat of Epoxy
Once the first layer of epoxy is totally dry, you can set the timer for the second layer. Follow the same instructions as the manufacturer lists on the ArmorClad kits. You have to wait for at least 24 hours to walk around the garage or basement. It is also suggested to wait even longer to put the heavy equipment and other items on the epoxy floor.
Final Thoughts:
The process of installing DIY epoxy floors can be quite tedious. For the Epoxy Floor, many people contact the Epoxy Service Contractor. However, the DIY epoxy kits are easy to apply and have industrial-level quality. With a DIY epoxy project, you also have the added benefit of customizing the floor according to your aesthetic preferences. You can have different colors and designs to suit your tastes in the basement and garage. With easy application, a DIY epoxy project only demands time and patience.
